
Step-by-step guide: convert Squarespace tables into reusable blocks
Synced Blocks plugin for Squarespace is a powerful tool for streamlining your site management. They allow you to create content once and use it across multiple pages. Any changes you make to the original block are instantly updated everywhere, saving you time and ensuring site-wide consistency.
This is especially useful for tables, which often contain data that needs to stay synchronized, such as pricing lists, product specifications, or event schedules. Using this method helps overcome Squarespace's limitation of not having a native table block and provides a robust way to manage complex data.
Squarespace reusable tables
Key Benefits of Using Synced Blocks for Tables
Streamlined Updates: Edit a table in one place, and it updates everywhere, eliminating the need to manually change each page.
Consistent Styling: Maintain uniform design and formatting across your entire site.
Improved Efficiency: Reduce repetitive work and save time on content management.
Enhanced User Experience: Ensure your visitors always see the most current and accurate information.
The Step-by-Step Tutorial
First you need to purchase a copy of Synced Blocks plugin, this process leverages Squarespace’s Blog Collection and Summary Block features to create and manage your reusable tables.
These steps below are specifically for creating reusable Table blocks. For a complete, comprehensive guide on creating and managing any type of reusable content with Synced Blocks in Squarespace, please refer to our general tutorial
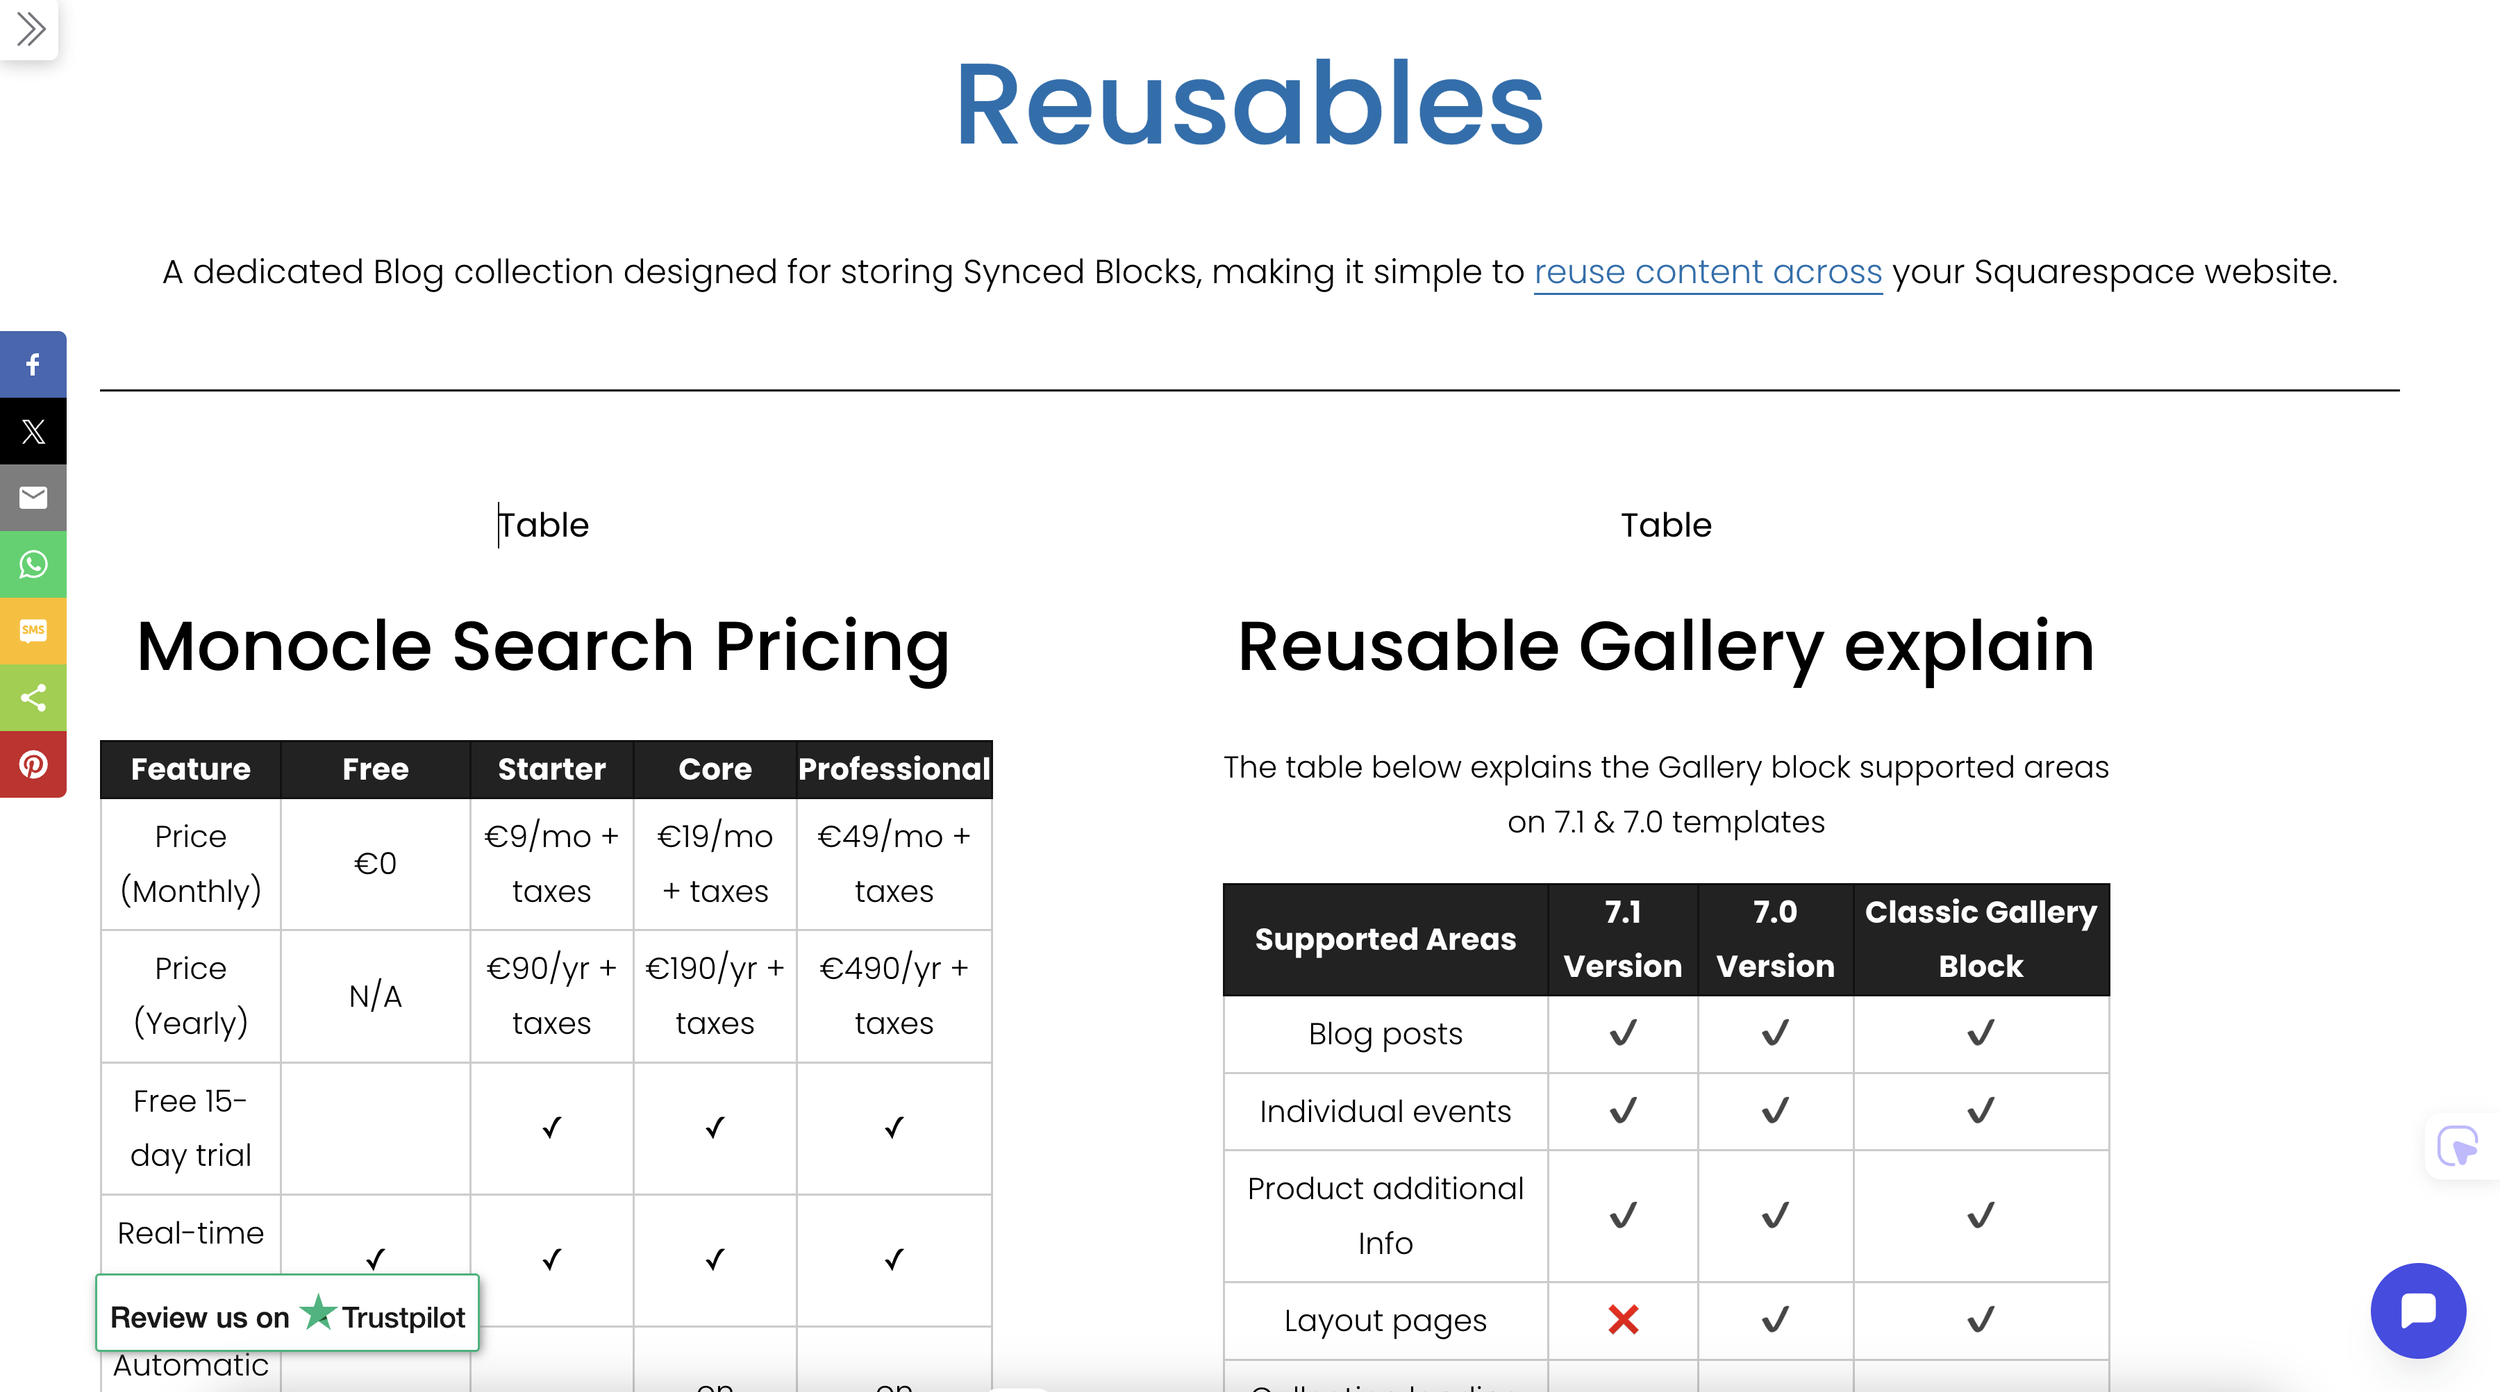
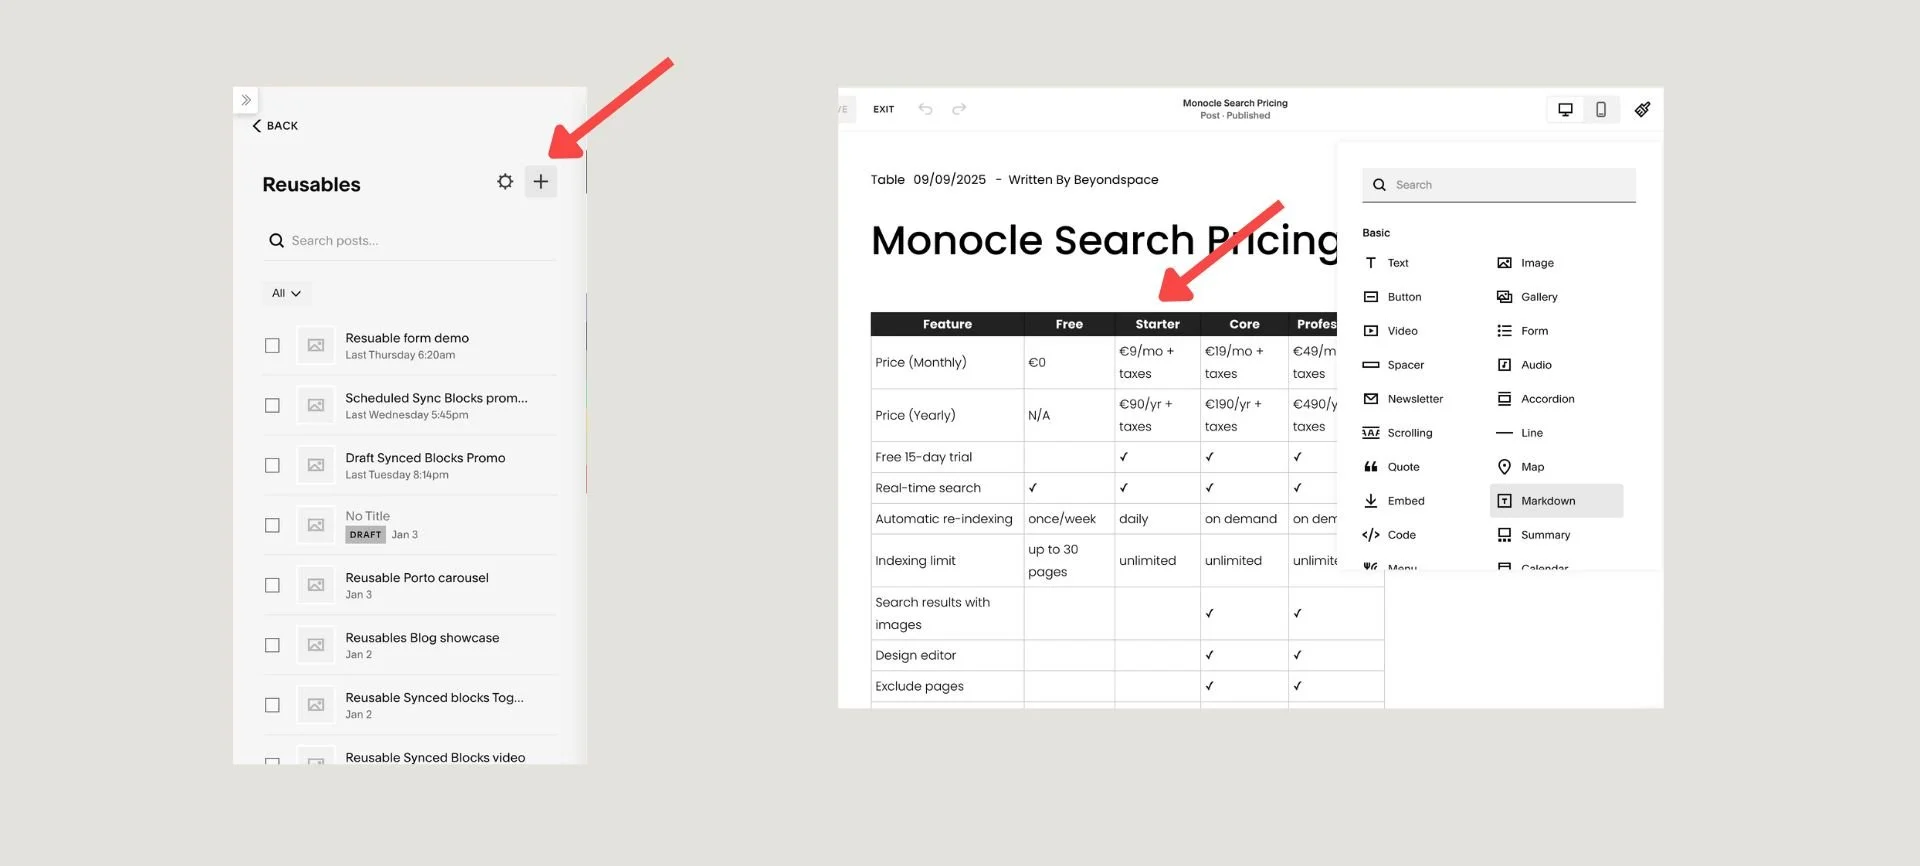
1. Create a "Reusables" Blog Collection
First, create a dedicated space to store all your reusable content.
In your Squarespace site, go to the Pages panel.
Add a new Blog page and name it “Reusables.”
Set the URL slug to
/reusables.This collection will act as your content library, keeping all your reusable blocks organized and separate from your main blog posts.
2. Build Your Table Content
Next, you'll create the table itself within a new blog post.
In the new “Reusables” blog, click to add a new post.
Use a Code Block, Markdown Block, or a table plugin supported by Squarespace
Give the post a clear, descriptive title, such as "Pricing Table" or "Product Specs." and publish the post.
Create reusable table block
3. Sync Table Content
To sync table content and populate it across instances, follow these steps:
Open the Reusables blog page and select the desired table content
Hover over the blog post, click the three-dot icon, and select Settings to open the settings dialog.
Click the Sync Content button to initiate the sync process.

Sync Table content
4. Insert the Reusable Table block on Pages
Finally, you can display your synced table on any page of your site.
On the page where you want to add the table, add a new block and select a Summary Block.
In the Summary Block's settings, set the source to your “Reusables” blog collection.
Enable Filter Items and locate the unique tag assigned to your Reusables table content.
Tips for Management and SEO
1. Update with Ease
To edit your table, simply go back to its original post in the “Reusables” collection, make your changes, and republish. All instances of the Summary Block on your site will update automatically.
2. Optimize for Search Engines
To prevent duplicate content issues, go to your “Reusables” blog page settings, navigate to the SEO tab, and toggle on “Hide Page from Search Results.” This ensures search engines only index the pages where the tables are displayed, not the original source post.
3. Responsive design via Block ID Targeting
Since the Synced Blocks plugin preserves the unique block ID of the original content, you can use it to create responsive designs that target specific versions of your table. This allows you to show a different layout for desktop and mobile users.
Step 1: Create two versions of the same table as separate reusable blog posts (e.g.,
pricing-desktopandpricing-mobile).Step 2: Include both tables on your page using the Synced Blocks plugin.
Step 3: Use a custom CSS block to target the unique IDs of the two tables and apply a media query to show/hide them.
For example, if your desktop table has the block ID #block-yui_3_17_2_1_15234234_12345 and your mobile table has #block-yui_3_17_2_1_15234234_67890, your CSS would look like this:
@media screen and (max-width: 767px) {
  /* Hide the desktop table on mobile devices */
  #block-yui_3_17_2_1_15234234_12345 {
    display: none !important;
  }
  /* Show the mobile table on mobile devices */
  #block-yui_3_17_2_1_15234234_67890 {
    display: block !important;
  }
}
@media screen and (min-width: 768px) {
  /* Hide the mobile table on desktop devices */
  #block-yui_3_17_2_1_15234234_67890 {
    display: none !important;
  }
}
4. Stay Organized
Use clear, consistent titles and tags for all your reusable tables. You can create a "Table" category within your Reusables blog. This makes it easy to keep track of all your reusable tables in one place.
Efficiently converting tables into synced blocks allows for quick updates, uniform styling, and better SEO practices in Squarespace. This approach ensures your data—like pricing, schedules, or product specs—is always up-to-date while simplifying your workflow.